This year I decided to step up my Mother's Day gift that my students make for their Moms. I came up with these super cute silhouette pictures. They look like a million bucks, but they only cost $1.00 each to make!
These silhouette pictures turn out so darling that they make the perfect gift not only for Mother's Day, but are great to make for your students to give to their parents/guardians as a Christmas gift, end of the school year gift, etc! They would also be great to make as a Grandparent's Day gift!
Here is what the completed silhouette picture looks like!
The nameplate below the silhouette has the child's information such as their name, the date it was made, how old they are, the grade level they are in, etc.
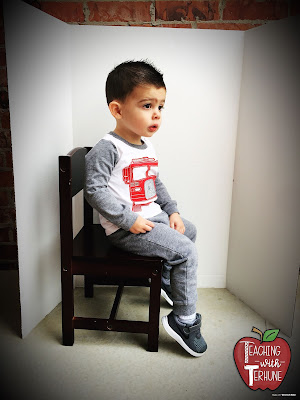
To make my example picture I decided to enlist my 2 year old son to help me out. He didn't mind being my little model. ;)
Here are the steps I followed to make the silhouette pictures:
Step 1: Take the Pictures
To begin you will need to take each child's picture in front of a solid white background. I used a white science fair poster board, but you could use white butcher paper, poster board, etc. It is very important to make sure the lighting in the room is not creating any type of shadow on your white background. If the shadow effect is happening try moving outside or to a different area of the room to take the picture. *This is very important for future steps.*
Have each child turn to the side and take their profile picture.
Step 2: Insert Pictures into PowerPoint
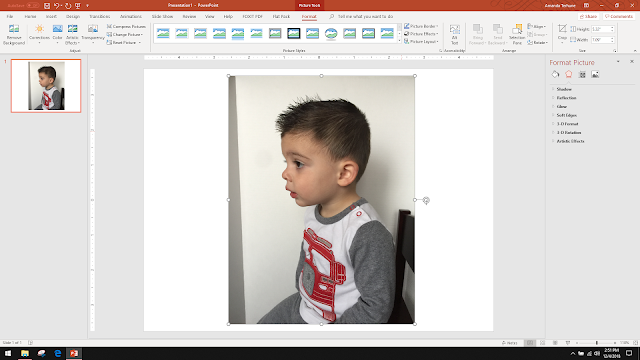
After you have uploaded the pictures you took onto your computer you will then insert them into a blank PowerPoint document.
Step 3 : Remove the Background
To create the silhouettes you will have to remove the background of each picture. To do that begin by double clicking on the picture. On the FORMAT tab click on the "Remove Background" icon.
Once you have clicked, "Remove Background" everything that will be removed is now highlighted in purple. Carefully check over your picture and make sure that there are not any parts highlighted in purple that you do not want gone from your picture. *Important things to double check are the nose, mouth, and eyelashes in the picture.
If everything looks good just simply click somewhere outside of the picture and everything that was highlighted in purple will be removed.
If your picture has missing parts and/or parts that are going to be removed that shouldn't be then you will need to use the "Mark Areas to Keep" and/or "Mark Areas to Remove" icons.
For example, in this picture I had to select the "Mark Areas to Keep" icon and then click on the areas on the picture I wanted to keep such as the hair, lips, and clothes.
Once you have the picture how you want it click somewhere outside of the picture to remove the background.
Step 4: Make the Picture Black
Once you have your background removed you are now ready to make your image black. Select your image, right click, and select the "Format Picture" option.
On the "Format Picture" toolbar click on the "Picture" icon. Under "Picture Corrections" find the "Brightness" option.
Slide the "Brightness" bar all the way to the left (-100%) and your picture is now black!
Step 5: Crop the Silhouette
If you want your silhouette to only have a little bit of the shoulder area showing then you will want to crop your picture. To do this select your image, on the FORMAT toolbar select, the "Crop" option.
Drag the box with the black corners to select the parts of the photo that you want to keep. When you are done click somewhere outside of the image to crop the picture.
Step 6: Resize the Image
Next, you will need to resize the silhouette to fit the space in the 8x11 frame perfectly. To do this simply click on the image and drag the right corner in or out to make the image smaller or larger.
Step 7: Print the Image
Once you have the silhouette the size you need you are ready to print! To print the image select - FILE - EXPORT - CREATE PDF/XPS DOCUMENT. Save the document on your computer and open the PDF you just created. Print directly from that PDF file.
Step 8: Purchase the Silhouette Picture Frames
I chose to purchase these black matted plastic 8x11 picture frames from Dollar Tree. The white photo mat adds a nice touch to the finished project. They are $1.00 each.

Not only can you purchase these at your local Dollar Tree but if you don't want to run around town trying to find a class set of the frames you can order them online HERE! They offer free in-store pickup as well!

Not only can you purchase these at your local Dollar Tree but if you don't want to run around town trying to find a class set of the frames you can order them online HERE! They offer free in-store pickup as well!
Step 9: Cutting out the Silhouettes
After you have created and printed your silhouettes it is now time to cut them out. It really isn't that hard to do but make sure you don't leave out any tiny details when you are cutting.
It's best if you can use a great pair of sharp pointed scissors.
Step 10: Making Nameplates
Under each student's silhouette you will want to include a nameplate that has each child's name, the date, the grade they are in, etc. You can print the nameplates on plain white paper or on any color paper you would like.
You can download my editable nameplates by clicking HERE!
Step 11: Choosing the Background to the Silhouettes
Once you have the silhouettes and nameplates cut out it is time to pass them out to your students and let them finish creating the picture frames! Have your students choose which color background they would like to put their silhouette on. You can have an assortment of scrapbook paper designs, colored construction paper, colored printer paper, etc.
Each background paper should be precut to fit inside the 8x11 picture frame.
Step 12: Attaching the Silhouettes
Have your students use stick glue to attach the silhouette and nameplate to the background paper.
Helpful Hint: It is so much easier for the students to glue the silhouette and the nameplate in the perfect spot on the background paper if you take the glass off of the picture frame first. Once they have their pictures set on their background paper then add the glass back on the frame.
The silhouette picture frames are now finished! These make such a sweet and memorable gift for parents!
Here's a look at how the silhouettes look on different colors and styles of backgrounds.
The black and white background is my favorite!
If you have any additional Mother's Day gifts to wrap check out my Mother's Day Gift Bag craft that student's can make!
You can click HERE to download my Mother's Day Gift Bag Craft from my TpT Store!


0 comments:
Post a Comment