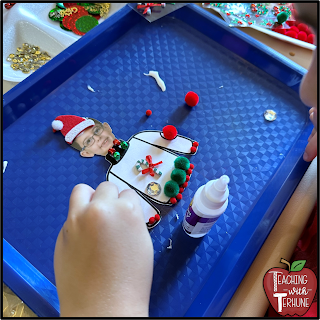
Looking for a cute, funny, and inexpensive gift for your students to make for their parents for a Christmas gift?
These ugly Christmas sweater ornaments are fast and simple to make and are a great keepsake for parents!
Here are the steps on how to make these ugly Christmas sweater ornaments:
Step 1:
For this craft you will need multiple craft items for your students to decorate their ugly Christmas sweaters with. This might include gemstones, stickers, mini jingle bells, sequins, pom pom balls, etc.
Step 2:
First, take pictures of each of your students. When taking the picture make sure each student is looking straight ahead. Also, make sure to include their neck in the picture.
Step 3:
Add each student’s picture to this PowerPoint presentation. Crop the student’s photo where just their head and neck are in the picture. *Make sure to keep some of their neck in the picture – this is very important when placing the picture on each sweater template.
Step 4:
Resize the cropped picture to about 2.65 inches in height. Each student picture should fit inside one of the boxes. Once you have all your students’ pictures placed in the boxes, save this PowerPoint as a PDF and print the picture page. Laminate and cut out each picture. Make sure to leave the neck in each picture!
Step 5:
Next, print the different sweater templates on cardstock paper. I like to use red, dark green, light green, and white colored cardstock paper.
Then, cut out each sweater.
Step 6:
I add a piece of tape on the back to place it in the correct spot. Then, I add a larger piece of box tape to the back to secure the picture.
Step 7:
Then, using all the miscellaneous craft supplies have your students decorate their ugly Christmas sweater.
They can color with markers, add stickers, use miscellaneous craft supplies, etc.
Step 8:
Using the price tag template, type in each student’s information. Print the tags on cardstock paper and cut them out.
Students can color their price tag if they would like.
Step 9:
Have your students attach their price tag to their sweater. I like to have them place the price tag on the sleeve of their sweater.
Attach a small ribbon on top of the price tag if you would like.
Step 10:
Finally, attach a piece of ribbon or string from shoulder to shoulder of the sweater. You can glue the ribbon or use hot glue for extra durability. I also like to tie a ribbon bow to the top of the string as well.
Step 11:
The ornament is now complete!
These ornaments turn out so cute and are a sweet keepsake parents can put on the Christmas tree each year!
Step 12:
Have your students wrap their ornament. You can grab this printable Snowman gift bag HERE!
Now your parent gifts are ready to send home!
Additional Ideas:
Simply bend the paperclip three times (like shown above) to create the hanger.
This is good to do if you don’t have time or don’t want to take each student’s picture.
Here’s an example of how the ornaments turn out with a hanger instead of a student picture. Both versions turn out super cute!


I purchased the ugly sweater activity but it gives me blank pages when I try to print it.
ReplyDelete*Printing Tip* - After you have entered your text on the name tag template save the PowerPoint as a PDF file by selecting File - Export - Create PDF. Then print from that PDF file you just created. Please email me at amandaterhune1@hotmail.com if you are still having trouble.
Delete